Category Archives: Recipes

Halloween Cobweb Cookie {Recipe}

For me, October is the beginning of the crazy holiday season.  First comes Halloween, then Thanksgiving and then December is just jam packed with holiday celebrations.  This time of year is when I love to craft and create with the kids and also entertain guests.  With Halloween fast approaching, I felt it was only appropriate to create a fun Halloween treat for us to enjoy.


To create this delicious masterpiece, you will need:

Ingredients
– 1 tube of sugar cookie dough
– 1 apple diced
– 1/3 c creamy peanut butter
– 15-20 pretzel twists
– 1 bag of M&M’s
– 1 bag of candy corn
– 1 cup of white chocolate chips
– 3 tbsp orange frosting
– 3 tbsp black frosting

Directions:

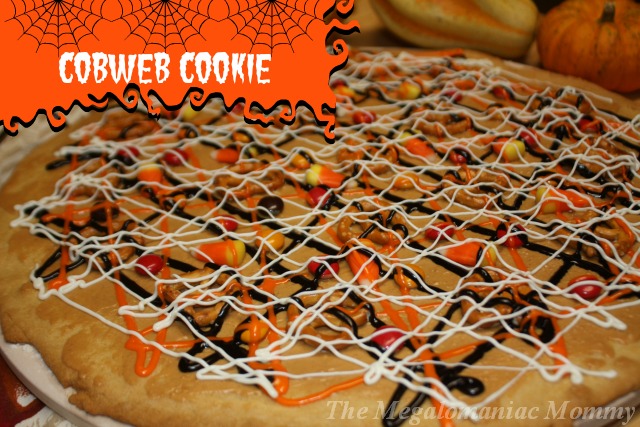
1. Roll out cookie dough on a pizza pan, pizza stone or other pan of choice. (I used a greased pizza stone).

2. Bake cookie dough at 350* for 12-15 minutes and remove from over.

3. While cookie is baking, mix the diced apples with the peanut butter until it is mixed well.

4. After removing cookie from oven, spread apple peanut butter mixture onto cookie allowing it to melt and spread easier this becomes the glue for the goodies!).

5. Once apple peanut butter mixture is on, place pretzels, candy corn and M&M’s however you would like on the cookie.

6. Take your 3 tbsp of orange frosting and place it in a ziploc bag, cut a small hole in the corner and pipe frosting on in desired pattern. Repeat this step with the black frosting.

7. After frosting is on, melt the white chocolate chips in the microwave following instructions on the back of the package. Once melted, place white chocolate in a ziploc bag, cut a small hole in the corner and pipe chocolate on in the desired pattern.

8. Allow the cookie to cool and frosting/chocolate to harden and then cut and serve!

Enjoy!!

Everyone in our house really enjoyed this treat and the kids are already asking me to make it again!


Easter Bunny Bark

It’s hard to believe that it is almost Easter and before we know it, our house will be filled with kids running wild on a sugar high.

This year, we are changing things up for Easter and the kids are going to be getting some homemade goodies in their baskets in addition to some traditional confections. To get the holiday festivities going, we are starting it off with this Easter Bunny Bark!

Making Easter Bunny Bark is so easy that my teenagers can do it!

To get started, you will need:

-Lots of Easter candy. M&M’s, Jelly Beans, and other pretty pastel candies. 
-20 ounces of good white chocolate, like Ghirardelli squares.

Once your candy is procured, roughly chop the larger pieces of candy if you are using any.

After your candy is ready, line a 9×11 pan with parchment paper.

Next, it is time to melt your chocolate. When melting the chocolate its your choice which way you choose do it. You can either melt it in a microwave or in a double broiler style pot, we prefer to use the microwave in our house.

*If using a microwave start at 30 seconds stir and repeat until fully melted.

*If you’re using stove top keep temp. at medium range make sure you are stirring constantly

Pour melted chocolate onto parchment paper and spread.

After your chocolate is all poured out, start adding candy to it, however you like.

Let the Easter Bark sit for several hours until it hardens. We let ours sit in the fridge overnight.

Once your chocolate is fully hardened, transfer it to a cutting board and cut into pieces and enjoy.


Low Cal Spinach & Artichoke Dip { Recipe }

If you are a sucker for delcious, creamy spinach and artichoke dip like I am then this is the recipe for you! This recipe makes 8 servings at only 150 calories each and it is absolutely delicious. We loved it so much we enjoyed it as our entire lunch while watching football!

Creating this dish is easy any only requires a few ingredients.  To get started, you will need the following:

Ingredients

  • 1 (10oz) package of frozen chopped spinach (thawed and drained)
  • 1 (14oz) can of artichoke hearts drained and chopped
  • 1 (8oz) container of plain Greek yogurt
  • 1 cup shredded,part skim, low-moisture mozzarella cheese
  • 1/2 cup of green onion chopped
  • 1 tsp minced garlic

Directions

  • Preheat over to 350*.
  • Once all of your ingredients are prepped, mix them in a large bowl and then pour the mixture into a 9 inch  pie dish or 1 quart casserole dish.
  • Bake for 25 minutes 
  • Serve and enjoy!

We served ours with carrot sticks and tortilla chips and couldn’t get enough of it!

5 More Reasons to Love your Blender

Yes, the classics never go out of style, but if you’re just using your blender to make smoothies and milkshakes, you haven’t even scratched the surface of what a quality Breville blender can do. A blender is an easy and convenient way to create a wide variety of delicious dishes with less prep time and clean up. Once you try a few of these simple preparations, you may even discover ways to improve your old favorite recipes by using a blender…the possibilities are limited only by your imagination.

Fresh Coffee

Using a blender to grind coffee beans allows you to customize the texture of your favorite beans, making them as coarse or as fine as you like to release the perfect amount of rich, fresh-brewed flavor. You can even grind beans in advance and store them in an airtight container away from heat and light for up to two weeks. However, freshly ground beans should never be stored in the freezer, as this can create moisture in the container and rob the coffee of its flavor.

Dry Rubs                         

A blender is also an easy way to create savory rubs and dry marinades for cooking. A quick and delicious spice blend can be made with a tablespoon of whole black peppercorns combined with equal parts coriander, paprika, cumin and red chili flakes. Apply the rub liberally to steaks, burgers and chicken before grilling for deep flavor and a spicy kick.

Omelets

Blenders make it easy to whip up those light, airy and irresistible omelets that keep you coming back to your favorite breakfast place. Making a restaurant quality omelet at home is as easy as placing two eggs, a tablespoon of full fat milk, salt and pepper into your blender jar and blending on high until the mixture is frothy. Next, melt a pat of butter in a nonstick pan and pour the egg mixture in, carefully controlling the setting omelet with a spatula. When the omelet is nearly set, add two tablespoons of cheese as well as any other desired fillings on half of it, fold the other half over it, remove from heat and enjoy.

Salsa

Fresh salsa is always a treat, and your blender can be the key to the perfect bowl of this delicious dip. A few fresh tomatoes, a clove of garlic, a small onion and as many jalapeno peppers as you need to turn up the heat are all you need to create the freshest salsa you’ll ever taste, all processed to your perfect consistency in your blender.

Whipped Cream

There is no better topping for many desserts than a healthy dollop of freshly whipped cream, and with a blender you can have it on demand. To make whipped cream in your blender, just pour half a cup of heavy cream into the jar of your blender and process on medium speed until soft peaks begin to form. Next, add a tablespoon of sugar and a teaspoon of vanilla extract and blend for 20 more seconds or until the whipped cream is set. Add it to ice cream or warm brownies and never buy a premade tub again!

Of course, a freshly made margarita is hard to beat, but don’t limit your blender to frozen drinks. Blenders are a fast and easy way to make a variety of delicious dishes and even create better ingredients to use in your favorite foods, making them one of the most valuable tools in the kitchen of the savvy cook.

Low Cal Strawberry Cupcakes

Since we are trying to live a healthier life, I have been trying to find new foods to introduce to the family. Since we all tend to have a sweet tooth, I wanted to find something sweet yet low cal to eat.
Problem solved.
Meet Low Cal Strawberry Cupcakes.

Less than 100 calories each!
Ingredients:

1 – Strawberry Cake Mix

1- 12oz can Diet 7up

1- container Fat Free Cool Whip


Directions:

Pour cake mix in a bowl, slowly add whole can of soda, mix and put batter into cupcake tins.

Bake as directed.

Cool

Top with a dollop on Cool Whip

ENJOY!!